Clean up whisper database

Ending up on this page means that you already know that whisper is not that disk space efficient.
Unless you have unlimited disk space, which you don't have, at some point you would want to clean it up.

This is how I am doing it:

1. Delete old metrics of ours that haven't been written to for over 90 days
[codesyntax lang="bash"]

# just to satisfy my curiosity: how much disk space I will gain
find /data/db/whisper/ -name "*wsp" -mtime +90 -exec echo -n -e {}"\0" \; | du -hc --files0-from=-
# delete the files!
find /data/db/whisper/ -type f -mtime +90 -name "*wsp" -exec rm '{}' \;

[/codesyntax]

2. Delete empty directories
[codesyntax lang="bash"]

# how many do we have?
find /data/db/whisper/ -type d -empty | wc -l
# remove them!
find /data/db/whisper/ -type d -empty -delete

[/codesyntax]

Which processes are swapping?!

Recently one machine was swapping. No free space on the swap partition. Hmmm... Since this machine was used as a database server, obviously I suspected mysql. But why to guess when I could knew for sure which process was swapping...

[codesyntax lang="bash"]

for file in /proc/*/status ; do awk '/VmSwap|Name/{printf $2 " " $3}END{ print ""}' $file; done | sort -k 2 -n -r | less

[/codesyntax]

Wasn't mysql but collectd btw :)

Topology refactoring using classic MySQL replication commands - version 2

This one in not very different than Topology refactoring using classic MySQL replication commands - version 1, actually it's the other way around.

Context:

  • Initial state:
    dbfoo1(M) - dbfoo2(S)
              \ dbfoo3(S)
  • Desired state:
    dbfoo1(M) - dbfoo2(MS) - dbrfoo3(S)
  • Let's get it done:

    1. stop slave on dbfoo3
    2. MariaDB [(none)]> stop slave;
    3. check the "freezing point" on dbfoo2 and note down the output from 'show' commands
    4. MariaDB [(none)]> stop slave; show master status\Gshow slave status\Gstart slave;
      
      *************************** 1. row ***************************
                  File: bin.009642
              Position: 91547140
          Binlog_Do_DB: 
      Binlog_Ignore_DB: 
      1 row in set (0.00 sec)
      
      *************************** 1. row ***************************
                     Slave_IO_State: 
                        Master_Host: dbfoo1
                        Master_User: user
                        Master_Port: 3306
                      Connect_Retry: 60
                    Master_Log_File: bin.293567
                Read_Master_Log_Pos: 90061272
                     Relay_Log_File: relay.028914
                      Relay_Log_Pos: 90061553
              Relay_Master_Log_File: bin.293567
                   Slave_IO_Running: No
                  Slave_SQL_Running: No
                    Replicate_Do_DB: 
                Replicate_Ignore_DB: 
                 Replicate_Do_Table: 
             Replicate_Ignore_Table: 
            Replicate_Wild_Do_Table: 
        Replicate_Wild_Ignore_Table: 
                         Last_Errno: 0
                         Last_Error: 
                       Skip_Counter: 0
                Exec_Master_Log_Pos: 90061272
                    Relay_Log_Space: 90062173
                    Until_Condition: None
                     Until_Log_File: 
                      Until_Log_Pos: 0
                 Master_SSL_Allowed: No
                 Master_SSL_CA_File: 
                 Master_SSL_CA_Path: 
                    Master_SSL_Cert: 
                  Master_SSL_Cipher: 
                     Master_SSL_Key: 
              Seconds_Behind_Master: NULL
      Master_SSL_Verify_Server_Cert: No
                      Last_IO_Errno: 0
                      Last_IO_Error: 
                     Last_SQL_Errno: 0
                     Last_SQL_Error: 
        Replicate_Ignore_Server_Ids: 
                   Master_Server_Id: 270
                     Master_SSL_Crl: 
                 Master_SSL_Crlpath: 
                         Using_Gtid: No
                        Gtid_IO_Pos: 
      1 row in set (0.00 sec)
      
      Query OK, 0 rows affected (0.00 sec)
    5. make sure dbfoo3 has the same data as dbfoo2 and use Relay_Master_Log_File and Exec_Master_Log_Pos from show master status
    6. MariaDB [(none)]> start slave until master_log_file='bin.293567', master_log_pos=90061272;
    7. point dbfoo3 to dbfoo2 and start the slave
    8. MariaDB [(none)]> stop slave;
      MariaDB [(none)]> change master to master_host='foo2', master_log_file='bin.009642', master_log_pos=91547140;
      MariaDB [(none)]> start slave;

Topology refactoring using classic MySQL replication commands - version 1

A week ago I wrote a post about promoting a mysql slave as master. Today I will write topology refactoring using classic replication commands.

Context:

  • Initial state:
    dbfoo1(M) - dbfoo2(MS) - dbrfoo3(S)
  • Desired state:
    dbfoo1(M) - dbfoo2(S)
              \ dbfoo3(S)

Let's get to work:

  1. stop slave on dbfoo3
  2. MariaDB [(none)]> stop slave;
  3. check the "freezing point" on dbfoo2 and note down the output from 'show' commands
  4. MariaDB [(none)]> stop slave; show master status\Gshow slave status\Gstart slave;
    
    *************************** 1. row ***************************
                File: bin.009642
            Position: 91547140
        Binlog_Do_DB: 
    Binlog_Ignore_DB: 
    1 row in set (0.00 sec)
    
    *************************** 1. row ***************************
                   Slave_IO_State: 
                      Master_Host: dbfoo1
                      Master_User: user
                      Master_Port: 3306
                    Connect_Retry: 60
                  Master_Log_File: bin.293567
              Read_Master_Log_Pos: 90061272
                   Relay_Log_File: relay.028914
                    Relay_Log_Pos: 90061553
            Relay_Master_Log_File: bin.293567
                 Slave_IO_Running: No
                Slave_SQL_Running: No
                  Replicate_Do_DB: 
              Replicate_Ignore_DB: 
               Replicate_Do_Table: 
           Replicate_Ignore_Table: 
          Replicate_Wild_Do_Table: 
      Replicate_Wild_Ignore_Table: 
                       Last_Errno: 0
                       Last_Error: 
                     Skip_Counter: 0
              Exec_Master_Log_Pos: 90061272
                  Relay_Log_Space: 90062173
                  Until_Condition: None
                   Until_Log_File: 
                    Until_Log_Pos: 0
               Master_SSL_Allowed: No
               Master_SSL_CA_File: 
               Master_SSL_CA_Path: 
                  Master_SSL_Cert: 
                Master_SSL_Cipher: 
                   Master_SSL_Key: 
            Seconds_Behind_Master: NULL
    Master_SSL_Verify_Server_Cert: No
                    Last_IO_Errno: 0
                    Last_IO_Error: 
                   Last_SQL_Errno: 0
                   Last_SQL_Error: 
      Replicate_Ignore_Server_Ids: 
                 Master_Server_Id: 270
                   Master_SSL_Crl: 
               Master_SSL_Crlpath: 
                       Using_Gtid: No
                      Gtid_IO_Pos: 
    1 row in set (0.00 sec)
    
    Query OK, 0 rows affected (0.00 sec)
  5. make sure dbfoo3 has the same data as dbfoo2 and use File and Position from show master status
  6. MariaDB [(none)]> start slave until master_log_file='bin.009642', master_log_pos=91547140;
  7. point dbfoo3 to dbfoo1 and start the slave
  8. MariaDB [(none)]> stop slave;
    MariaDB [(none)]> change master to master_host='foo1', master_log_file='bin.293567', master_log_pos=90061272;
    MariaDB [(none)]> start slave;

mysql: Promoting a slave to master

I assume you you have a high availability (master - slave topology) setup. I will be brief and technical on this one :)

Context:

  • dbfoo1 is master and dbfoo2 is slave - dbfoo1(M) - dbfoo2(S)
  • dbfoo2 has to be promoted to master - dbfoo2(M) - dbfoo1(S)
  • note that in some cases the slave requires a innodb buffer pool warm-up before being promoted to master

Let's get to work:

  • remove the VIP from dbfoo1 (/etc/network/interfaces)
  • add the VIP to dbfoo2 (/etc/network/interfaces)
  • take down the VIP on dbfoo1

[codesyntax lang="bash"]

dbfoo1# ip a d dev eth0 x.x.x.x/y

[/codesyntax]

  • dbfoo2 should not be lagging behind dbfoo1
dbfoo2> show slave status\G
Relay_Log_Space: 0
Seconds_Behind_Master: 0
  • check the "freezing point" on dbfoo1 and note down the output from 'show' commands (this is optional but good to have)
dbfoo1> flush logs;
dbfoo1> show master status\G
dbfoo1> show slave status\G
  • check the "freezing point" on dbfoo1 and note down the output from 'show' commands
dbfoo2> slave stop;
dbfoo2> flush logs;
dbfoo2> show master status\G  <--- from here use File: and Position: to attach dbfoo1 (two steps below)
dbfoo2> show slave status\G
MariaDB [(none)]> show master status\Gshow slave status\G
*************************** 1. row ***************************
            File: bin.005662
        Position: 385
    Binlog_Do_DB: 
Binlog_Ignore_DB: 
1 row in set (0.00 sec)

*************************** 1. row ***************************
               Slave_IO_State: 
                  Master_Host: dbfoo1
                  Master_User: user
                  Master_Port: 3306
                Connect_Retry: 60
              Master_Log_File: bin.006034
          Read_Master_Log_Pos: 245
               Relay_Log_File: relay.017538
                Relay_Log_Pos: 523
        Relay_Master_Log_File: bin.006034
             Slave_IO_Running: No
            Slave_SQL_Running: No
              Replicate_Do_DB: 
          Replicate_Ignore_DB: 
           Replicate_Do_Table: 
       Replicate_Ignore_Table: 
      Replicate_Wild_Do_Table: 
  Replicate_Wild_Ignore_Table: 
                   Last_Errno: 0
                   Last_Error: 
                 Skip_Counter: 0
          Exec_Master_Log_Pos: 245
              Relay_Log_Space: 1128
              Until_Condition: None
               Until_Log_File: 
                Until_Log_Pos: 0
           Master_SSL_Allowed: No
           Master_SSL_CA_File: 
           Master_SSL_CA_Path: 
              Master_SSL_Cert: 
            Master_SSL_Cipher: 
               Master_SSL_Key: 
        Seconds_Behind_Master: NULL
Master_SSL_Verify_Server_Cert: No
                Last_IO_Errno: 0
                Last_IO_Error: 
               Last_SQL_Errno: 0
               Last_SQL_Error: 
  Replicate_Ignore_Server_Ids: 
             Master_Server_Id: 310
1 row in set (0.00 sec)

MariaDB [(none)]>
  • finish the flip - promote dbfoo2 as master by adding the VIP on it

[codesyntax lang="bash"]

dbfoo2# ip a a dev eth0 x.x.x.x/y

[/codesyntax]

  • connect dbfoo2  to the new master
dbfoo1> reset slave all;
dbfoo1> change master to master_host='dbfoo2', master_user='user', master_password='password', master_log_file='bin.005662', master_log_pos=385;
dbfoo1> slave start;
  • done!

Access HP's ILO remote console via SSH

It happened many times to need a quick access to the remote console of a server like HP's ILO and not be able to open a web browser just to access it.
So let access it via SSH. Here goes.

[codesyntax lang="bash"]

ssh ilo_admin@ip_address

[/codesyntax]

2. Enter your ILO admin account and password. After that you will see the ILO prompt.

hpILO->

3. To access the remote console of the server at the ILO prompt type "TEXTCONS"

hpILO->TEXTCONS

4. You will be presented with the Login: console. Enter your root or user account of the server to gain access.

Login:

Voilà!

Relay log read failure: Could not parse relay log event entry

It happened today... why? Well, I was testing parallel replication (slave_parallel_threads) and after setting the number of threads to zero and when started the slave I got this wonderful error message:

MariaDB [(none)]> show slave status\G
*************************** 1. row ***************************
               Slave_IO_State: Waiting for master to send event
                  Master_Host: master.example.com
                  Master_User: user
                  Master_Port: 3306 
                Connect_Retry: 60
              Master_Log_File: bin.077287
          Read_Master_Log_Pos: 12307299
               Relay_Log_File: relay.167660
                Relay_Log_Pos: 52428684
        Relay_Master_Log_File: bin.076470
             Slave_IO_Running: Yes
            Slave_SQL_Running: No
              Replicate_Do_DB: 
          Replicate_Ignore_DB: 
           Replicate_Do_Table: 
       Replicate_Ignore_Table: 
      Replicate_Wild_Do_Table: 
  Replicate_Wild_Ignore_Table: 
                   Last_Errno: 1594 
                   Last_Error: Relay log read failure: Could not parse relay log event entry. The possible reasons are: the master's binary log is corrupted (you can check this by running 'mysqlbinlog' on the binary log), the slave's relay log is corrupted (you can check this by running 'mysqlbinlog' on the relay log), a network problem, or a bug in the master's or slave's MySQL code. If you want to check the master's binary log or slave's relay log, you will be able to know their names by issuing 'SHOW SLAVE STATUS' on this slave.
                 Skip_Counter: 0
          Exec_Master_Log_Pos: 49487635
              Relay_Log_Space: 42906299762
              Until_Condition: None 
               Until_Log_File: 
                Until_Log_Pos: 0
           Master_SSL_Allowed: No
           Master_SSL_CA_File: 
           Master_SSL_CA_Path: 
              Master_SSL_Cert: 
            Master_SSL_Cipher: 
               Master_SSL_Key: 
        Seconds_Behind_Master: NULL 
Master_SSL_Verify_Server_Cert: No
                Last_IO_Errno: 0
                Last_IO_Error: 
               Last_SQL_Errno: 1594 
               Last_SQL_Error: Relay log read failure: Could not parse relay log event entry. The possible reasons are: the master's binary log is corrupted (you can check this by running 'mysqlbinlog' on the binary log), the slave's relay log is corrupted (you can check this by running 'mysqlbinlog' on the relay log), a network problem, or a bug in the master's or slave's MySQL code. If you want to check the master's binary log or slave's relay log, you will be able to know their names by issuing 'SHOW SLAVE STATUS' on this slave.
  Replicate_Ignore_Server_Ids: 
             Master_Server_Id: 1220 
               Master_SSL_Crl: 
           Master_SSL_Crlpath: 
                   Using_Gtid: No
                  Gtid_IO_Pos: 
1 row in set (0.00 sec)

To recover from this situation, I had to instruct MySQL to clear out all the relay-bin-logs beyond the following point:

Relay_Master_Log_File: bin.076470
Exec_Master_Log_Pos: 49487635

by doing the following:

[codesyntax lang="bash"]

STOP SLAVE;
CHANGE MASTER TO MASTER_HOST='master.example.com', MASTER_USER='user', MASTER_PASSWORD='password', MASTER_LOG_FILE='bin.076470', MASTER_LOG_POS=49487635;
START SLAVE;

[/codesyntax]

How to fix "ERROR: Connecting to daemon at /var/run/collectd-unixsock failed"

Sometimes connecting to the collectd unixsocket is not possible giving a connection refused.

This can be fixed manually by removing manually the socket file

[codesyntax lang="bash"]

rm /var/run/collectd-unixsock

[/codesyntax]

and then restart collectd

[codesyntax lang="bash"]

/etc/init.d/collectd restart

[/codesyntax]

collectd does not create a new socket file when there is already such a file. But the old file, which is not connected to any process certainly refuses connections all the time. Probably it is enough to remove that file if it exists whenever collectd will be started.

This is easily reproduceable:

[codesyntax lang="bash"]

killall -9 collectd
/etc/init.d/collectd restart

[/codesyntax]

not accepting anymore

mysql: preload InnoDB buffer pool

Why?! To avoid a lengthy warmup period after restarting the server, particularly for instances with large InnoDB buffer pools.

Things to be added to /etc/mysq/my.cnf:

# Shortened warm-up times with a preloaded InnoDB buffer pool
innodb_buffer_pool_dump_at_shutdown=ON
innodb_buffer_pool_load_at_startup=ON

Basically when MySQL receives the TERM signal will dump the InnoDB buffer pool /data/db/mysql/ib_buffer_pool and it will load it automatically when it will start. However, the buffer pool(s) dump can be done at any time when MySQL is running by doing:

SET GLOBAL innodb_buffer_pool_dump_now=ON;

By analogy the buffer pool(s) can be loaded manually by:

SET GLOBAL innodb_buffer_pool_load_now=ON;

Additionally the progress of the buffer pool(s) dump (although very quick) and load (not so quick) can be monitored by:

SHOW STATUS LIKE 'innodb_buffer_pool_dump_status';
SHOW STATUS LIKE 'innodb_buffer_pool_load_status';

The load operation can be interrupted by:

SET innodb_buffer_pool_load_abort=ON;

mdadm refuses to re-add failed member

Radu, thank you for helping me with this problem!

My beloved power distribution company had always have problems. It is common thing to have a power outage up to half an hour every few weeks. Lately however, the problems increased in rate and gravity. I don't know exactly what happened last time, but there were 2 power outages in 30 minutes and 6 in 24 hours. Voltage peaks and spikes, variations in the frequency and everything. The result: the UPS and one disk were broken. What doesn't kill you makes you stronger. I guess mine were not strong enough for this challenge. I also had a very old HITACHI disk which was already showing signs of failure (part of an RAID1 array) .

So I decided to replace both disks. This is a piece of cake operation, isn't it? It wasn't because the server was located in Romania and I am in Sweden.

After removing the faulty disk from the array and shutting down the server

[codesyntax lang="bash"]

mdadm /dev/md0 --fail /dev/sdb1 --remove /dev/sdb1
mdadm /dev/md1 --fail /dev/sdb2 --remove /dev/sdb2
mdadm /dev/md2 --fail /dev/sdb3 --remove /dev/sdb3

[/codesyntax]

I asked a friend of mine to physically replace the disk.

Then I re-added the disk in array

[codesyntax lang="bash"]

mdadm --add /dev/md0 /dev/sdb1
mdadm --add /dev/md1 /dev/sdb2
mdadm --add /dev/md2 /dev/sdb3

[/codesyntax]

and waited to sync.

[codesyntax lang="bash"]

echo 100000 > /proc/sys/dev/raid/speed_limit_min
watch -n1 cat /proc/mdstat

[/codesyntax]

The next thing was to reboot the server to make sure everything was fine.

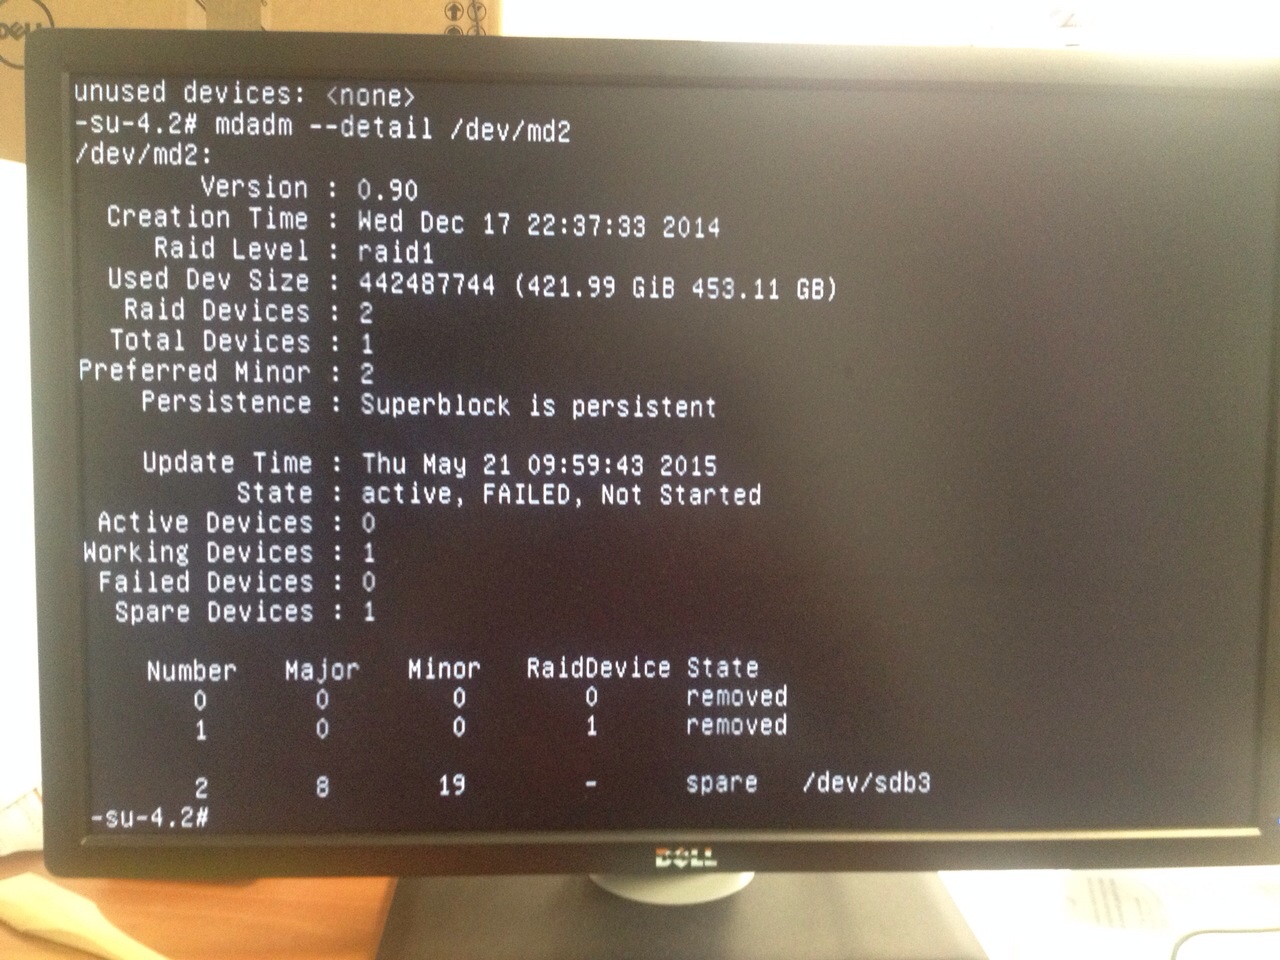
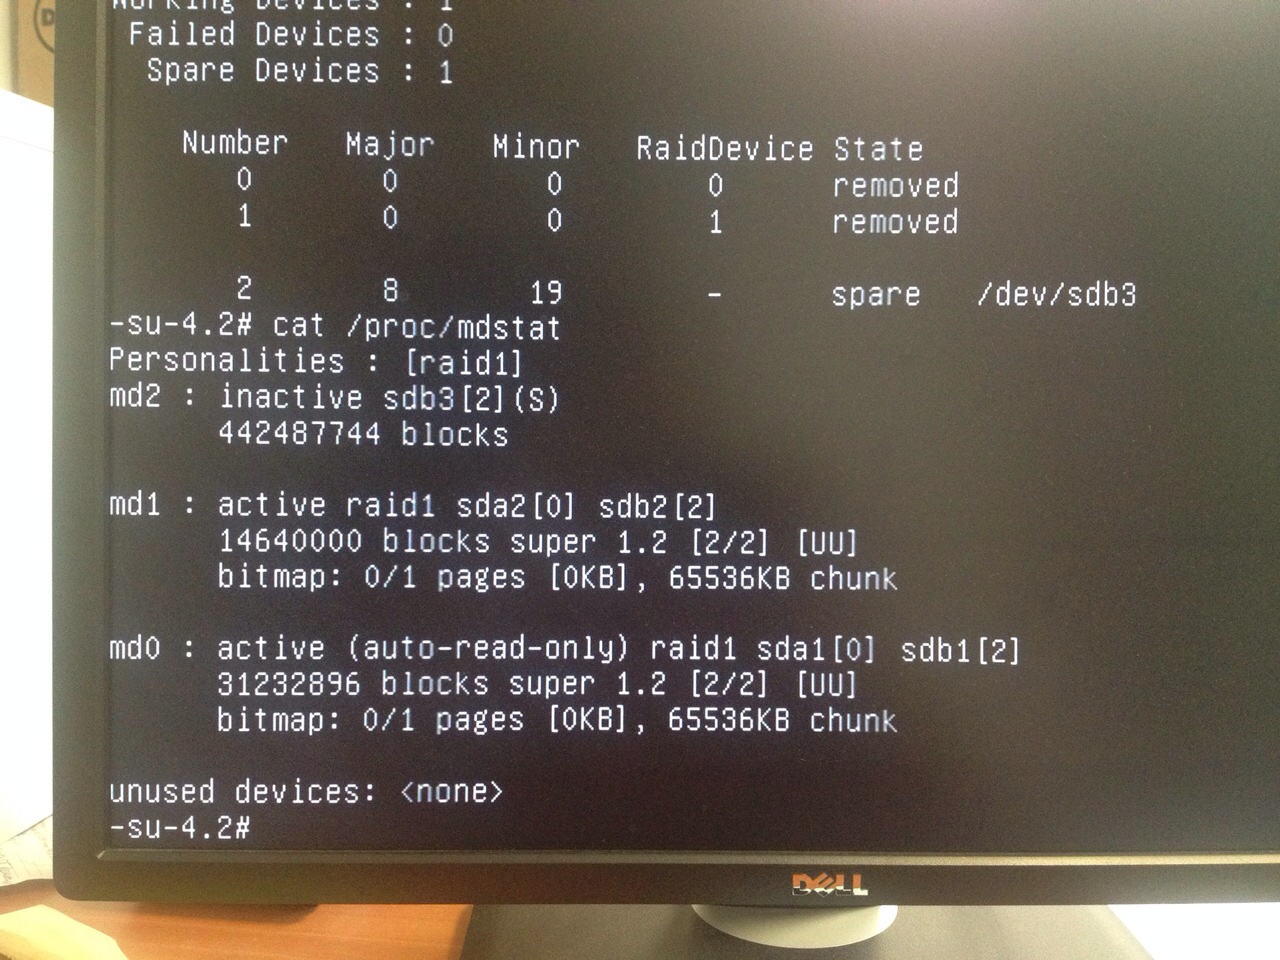
Well, it wasn't fine. I couldn't connect to the server, so something happened with the filesystem, raid or whatever.
After having a chat with my friend from Romania I find out that there was a problem with /dev/md2.

AvOeT3szbh6yExpxltAnYtHi69O3WzGwvAnW4tbaTs2p

AuQ0YqQNMQa_Ap1sPLpensRHAEkzdOj6YrZJvTTD--AC

AqUu6fs4CpZGMAsoB5KNkK9ruCo2SGjlKdtLEx5hhrcY

AhbCtrh2Yf6g5WgvtGMrmutdXKI9MGtYEiSIQnMNfRwe

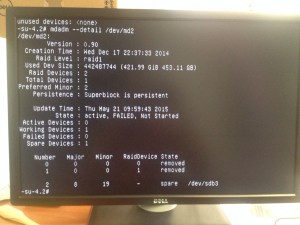
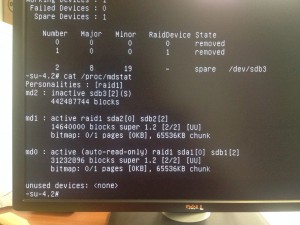
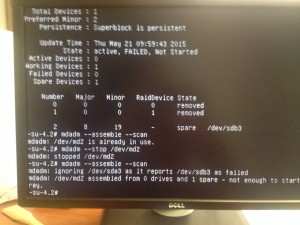
Something really strange was going on.

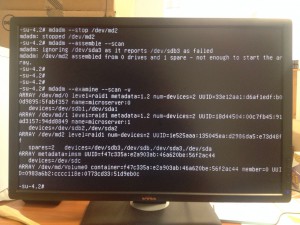
We tried different things like removing and re-adding the disk, --zero-superblock the new disk... More or less the same error.

When I was out of ideas and just about to give up when I received this messages from my friend "I fixed it for you!!!! Apparently there is a bug in metadata 0.90 and you have to use 1.2, but you can't choose metadata version with the debian installer. I sent you an email. Read it!".

Basically the email with the solution contained only one line: http://serverfault.com/questions/265056/mdadm-assembles-with-drives-instead-of-partitions

After he added DEVICE ... to /etc/mdadm/mdadm.conf the problem was solved.

[codesyntax lang="bash"]

vim /etc/mdadm/mdadm.conf

[/codesyntax]

DEVICE /dev/sda1
DEVICE /dev/sda2
DEVICE /dev/sda3

DEVICE /dev/sdb1
DEVICE /dev/sdb2
DEVICE /dev/sdb3